Let Claude or ChatGPT build your game: a hosted MCP server for game making
To let Claude or ChatGPT build your game, connect it to mcp.shinygen.ai, Shiny Gen's hosted MCP server. There is nothing to install: no engine, no editor plugin, no local server. Once connected, your assistant reads your live Shiny Gen project, writes GDScript, and generates art, 3D models and sound. Then it does the part that usually stays with you: it runs the game, takes screenshots, presses the controls, reads the runtime errors and fixes what it broke.
MCP (Model Context Protocol) is an open standard for giving an AI assistant tools. Shiny Gen exposes its engine, editors and generation models as MCP tools, so any assistant that speaks MCP can use them. This post covers the setup step by step, what the tools let the assistant do, what it costs, and the limits.
What you need
- A Shiny Gen account (free) and a game open in Shiny Gen, in a browser at shinygen.ai/play or in the app.
- An MCP client. The app gives steps for Claude (on the web, in the desktop app and in Claude Code), ChatGPT, Grok, Cursor and opencode. Any other MCP client works with the same address, and so does a client you write yourself.
Set it up
1. Open the model picker
In Shiny Gen, open the game you want to work on (or start a new one with the + button). Open the Agent tab at the bottom of the editor and tap the model name beside the chat box. The Choose a model list ends with Connect external model with MCP: choose it.
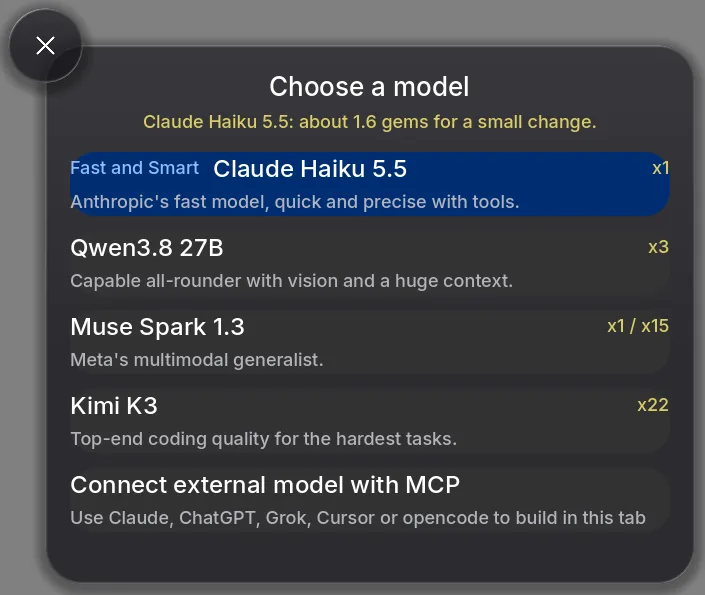
2. Press Host External Agent
The Bring your own AI screen opens. Under Connect your AI to this tab, press Host External Agent. The app then shows "Waiting for your AI to connect".
This step is required, and it comes first: until you press it, the server refuses your assistant and tells it to ask you to press this exact button. You do it once per session, and hosting stays open while Shiny Gen is open.
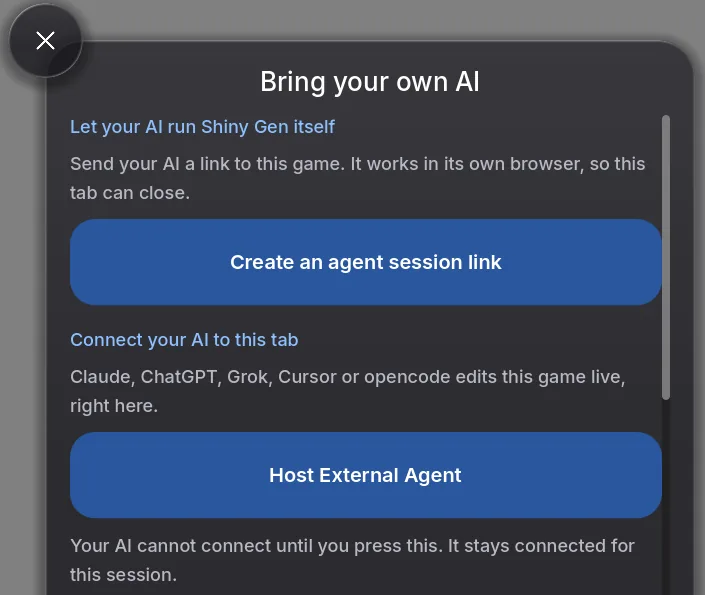
3. Add the server to your assistant
The address is:
https://mcp.shinygen.ai/mcpInclude the /mcp path; the host on its own is not the endpoint. Then, in your client:
- Claude Code: run this once, then type
/mcpto sign in.
claude mcp add --transport http shinygen https://mcp.shinygen.ai/mcp- Claude on the web or desktop: open Settings, then Connectors, then Add custom connector, and paste the address.
- ChatGPT: open Settings, then Connectors, and turn on Developer mode under Advanced. Choose Create, name it Shiny Gen, paste the address, and keep the sign-in option.
- Cursor: in Settings, find MCP and add a new server with the address, or add it to your
mcp.json. - Anything else: paste the same address wherever your client adds MCP servers or connectors.
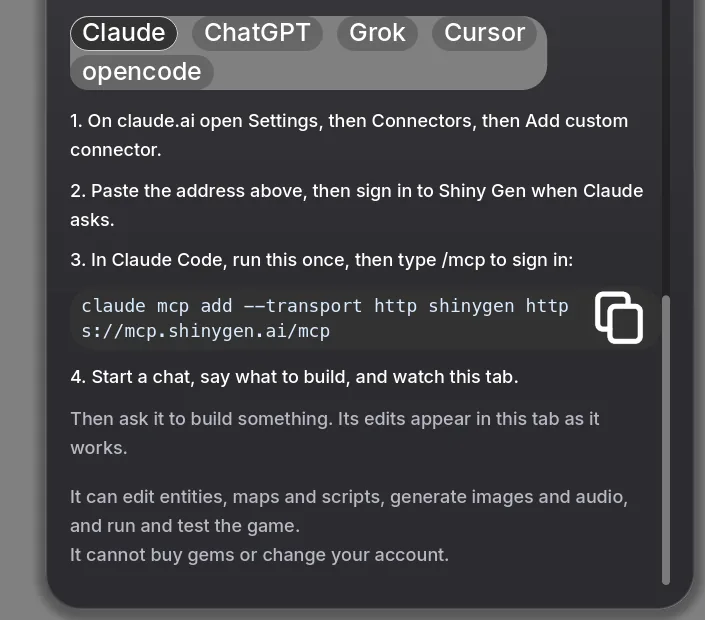
4. Approve access
The first time a client connects, your browser opens a Shiny Gen consent page. Sign in and approve. Sign-in uses OAuth, and the assistant asks for three permissions:
- projects.read: see your project: what is on screen, the open document and its current state.
- projects.write: write and edit game code and asset documents.
- assets.generate: run AI generation (images, 3D models, sprite animations, and art, music and behaviour written as code). This is the one that spends gems.
You can disconnect at any time, and Shiny Gen has a switch to stop all assistants from connecting to your account.
5. Ask for a game
Start a chat in your assistant and say what to build: "Make a top-down racing game with three laps against two computer cars. Arrow keys to drive. Show the lap count." Keep the Shiny Gen tab where you can see it: the edits appear there live as the assistant works, and you can play the game at any point.
What the assistant can do
The tools fall into five groups. Your assistant picks them itself.
- Read the project. See what is on screen, read and search the game's code, inspect the scene tree, and look up Shiny Gen's language reference and API. The docs come through the connector, so you do not need to teach your assistant anything or paste documentation.
- Write code. Replace or patch the game's GDScript. The game compiles and reports errors back with line numbers.
- Play-test. Run the game, run it for a stretch of game time or until a condition in the script is true, read the live errors and printed output, take screenshots (including bursts of frames to check motion), and press keys, taps and gamepad actions, including timed sequences when a move needs two buttons at once. For 3D games it can also check the scene for overlapping faces that flicker.
- Make assets. Generate images, turn a picture into a textured 3D model or an animated sprite sheet, remove an image's background, and browse or restore earlier versions. 3D models, 2D art, audio scores and per-entity behaviour can also be written as code: the assistant writes the document itself for free, or has a model generate it for gems, and either way you get a document you can keep editing.
- Manage games. Start a new game, list your games, open one ("go back to the platformer"), remix one, and get a share link.
That loop of write, run, look and press is the point. An assistant that can only write code has to guess whether the game works; one that can see and play it finds out.
What it costs
- Connecting is free.
- Code the assistant writes costs no gems. It runs on your own AI plan, so you pay your AI provider for the model, and Shiny Gen charges nothing for code edits.
- Generation spends gems: images, 3D models, animations, and anything the assistant asks a model to generate. Every paid result reports your gems before, spent and remaining.
- A daily gem cap limits how many gems a connected assistant can spend in one day, so an assistant left running cannot drain your balance.
- A weekly allowance on the free tier. Your first connection starts a 30-day trial with no allowance. After that, free accounts get a weekly allowance of actions that change something (writing code, generating, running the game), currently 300 a week, reset every Monday (UTC). Reading is never limited. Anyone who has made a purchase, from a $2.99 starter pack, is not subject to the allowance at all. Your assistant can check your current status through the connector.
Shiny Gen also has its own agent built into the app, with the same abilities. The difference is who runs the model: the built-in agent runs on Shiny Gen and each of its steps spends gems, while an outside assistant runs on your plan. See the pricing page for gem prices.
How a hosted server differs from desktop-bridge MCP servers
Most MCP servers for game engines are local bridges. You install the engine and a plugin for its editor, run a small server on your computer, and point your assistant at it with a command. The assistant then drives the desktop editor on that one machine. That is a good fit when you already work in a desktop engine: it reaches the whole editor, and the engine can make native builds of your game.
A hosted server works differently:
- Nothing to install. You add a URL and sign in. It works from an assistant in a browser, in a desktop app, or in a terminal.
- The game runs where you can see it, in your Shiny Gen tab or app, and you watch every edit land.
- Not tied to one computer. Hosting belongs to your account, so the Shiny Gen tab and the assistant can be on different machines, as long as both are signed in to the same account.
- Assets come with it. Image, 3D and sound tools are in the same server, billed in gems, with no separate accounts to set up.
The trade-offs are the same as Shiny Gen's own: projects run on our sandboxed fork of Godot, so the stock Godot editor cannot open them, and there are no native builds of your game yet.
Limits
- It works while Shiny Gen is open and hosting. If you close Shiny Gen or it loses its connection, hosting stops with it; press Host External Agent again and reconnect. Your assistant cannot work on your games with the app closed.
- It cannot buy gems or change your account. Purchases, settings and account changes are refused by the server.
- It works on your games only. It can browse the public catalogue and remix from it, but never change another person's game.
If your assistant has its own computer and browser and no connector screen (an agent that runs its own code, for example), there is a second way in: you make a one-time agent session link in the app and send it. The MCP reference covers it, along with the details for writing your own MCP client.
If it does not connect
- "Not hosting": press Host External Agent in the app, then connect again.
- No sign-in window appeared: allow pop-ups for your AI client's site and try again.
- The connection fails right away: check that the address ends in
/mcp. - "Agent access is switched off": turn on "Allow AI agents to connect" in the app or on the consent page.
FAQ
Is there an MCP server for Godot?
Yes, of two kinds. Local bridge servers connect an assistant to the desktop Godot editor on your computer, through an editor plugin. Shiny Gen's server at mcp.shinygen.ai is hosted: it drives a Godot game running in Shiny Gen, in your browser or the app, with nothing to install.
Do I need to install anything?
No. You add the address https://mcp.shinygen.ai/mcp to your assistant and sign in. The game runs in Shiny Gen in your browser or the app.
Does it work with ChatGPT?
Yes. In ChatGPT, turn on Developer mode under Settings, Connectors, Advanced, then create a connector with the address. Claude, Grok, Cursor, opencode and any other MCP client work too.
What does it cost?
Connecting and code edits cost no gems. Generating images, 3D models, animations and sound spends gems, with a daily cap. Free accounts get a 30-day trial, then a weekly allowance of actions (currently 300); any purchase from $2.99 removes the allowance.
Does it work with Shiny Gen closed?
No. Shiny Gen must be open and hosting, because the assistant works in your live session.
Can I build my own client?
Yes. The server uses Streamable HTTP and OAuth 2.1 with PKCE, with dynamic client registration for public clients. The MCP reference has the details.